In this article, I’ll try to explain how to true a motorcycle wheel. Got the spokes in place? Great! Not there yet? Read this article how to lace a motorcycle wheel. For some it may be dark art which only a few people can do, but I think it’s a job everybody can do with the right knowledge, tools, practice and patience.
What you Need to True a Motorcycle Wheel
Before you start, make sure you have everything you need:
- The wheel with the spokes in it
- Truing stand with a pointer
- Torque spoke wrench
- Tape
- Optional: Dial gauge as a pointer
- Patience…
You can create yourself a truing stand for a few bucks with this handy guide: Build Motorcycle Truing Stand
This works just fine, but if you’re planning to true wheels more often you can just buy one on eBay or Amazon (I use a Tusk truing stand).
Truing the Motorcycle Wheel
Everything in place? Cool! Let’s start truing the wheel! Before we start, keep in mind that for the truing process you have to think in the opposite direction: adjusting spokes on one side will have an effect on the alignment on the opposite side. I’ll explain this below with schematic images.
Give the wheel a spin in order to see how much “run-out” the wheel has. There are two types of runout: vertical and horizontal. We talk about a vertical run-out when the wheel is moving up and down when spinning around. The sideways movement of the wheel is called the horizontal run-out. In this article I’m working with a maximum tolerance of 1/16 of an inch (about 1,5mm). This is the maximum deviation my wheel can handle. Check your workshop manual or search the internet for the tolerance of your wheel.
In the most cases, a simple pointer will do the job to get the wheel within the maximum tolerance. If you really want to fine-tune the wheel you could use a dial gauge. But this isn’t necessary for most wheels.
Vertical alignment
 So we start with the vertical alignment of the wheel. Set the pointer of your truing stand in a position where you can measure the space between the pointer and the top side rim as shown in the image. Give the wheel a (slow) spin in order to find the “high spot”. This is the position where the distance between the pointer and the rim is the smallest. Put some tape on this spot to mark it and start adjusting the spokes in the area which I’ve highlighted in the image below. But be careful: only make small adjustments at a time! Tighten or loosen the spokes with ⅛ to ¼ turn. Keep rotating the wheel slowly in order to see what’s happening with your high spot. If done correctly the high spot will disappear. Remove the tape and give the wheel another spin to look for a new high spot and repeat the steps. Keep repeating this process till the wheel has no vertical run-out (or at least no more than the tolerance that suits your bike).
The principle of moving the rim (or hub as you like) up and down is shown in the image below:

Horizontal alignment

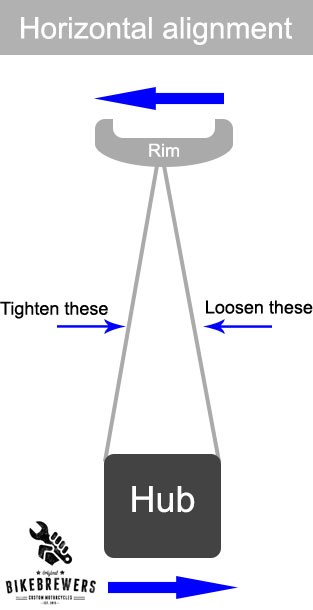
No vertical run-out? Great job! Let’s take a look at the horizontal ron-out. The process is pretty much the same as with the vertical run-out: set the pointer of your truing stand in a position where you can measure the space between the pointer and the side of the rim as shown in the image. Give the wheel a (slow) spin in order to find the “wide spot”. This is the position where the distance between the pointer and the rim is the smallest. Put some tape on this spot to mark it and start adjusting the spokes just as with the vertical alignment. Always work on three spokes at every side. So if you loosen three on one side, tighten the other three on the other side. Keep rotating the wheel slowly in order to see what’s happening with your wide spot. If done correctly the wide spot will disappear. Remove the tape and give the wheel another spin to look for a new high spot and repeat the steps. Keep repeating this process till the wheel has no vertical run-out.
The principle of moving the rim (or hub as you like) left and right is shown in the image below:
Tighten the Spokes
No vertical or horizontal run-out? Alright! That was the hardest part of truing your motorcycle wheel. Give your wheel a nice spin to enjoy your true wheel. Now you only need to tighten the spokes.
Since the spokes all have the perfect distance, you need to make all adjustments evenly around the wheel, you don’t want to create a new run-out! Mark a starting spot with tape (I usually start at the valve) and start tightening the spokes. Since the wheel is true, it is extremely important to tighten all spokes evenly! Start with ¼ turn each. When tightening the spokes you work your way around the wheel in the following pattern: first tighten all nr. 1 spokes, then all nr. 2 spokes until you’ve tightened all spokes. See the image below:

Alternatively, you could work with a pattern where you tighten every third spoke, in this case you start with nr.1, skip 2 spokes and tighten nr. 4, skip 2 spokes, tighten nr. 3 and so on. The theory behind this pattern is that it would allow the tension on both sides of the rim within the same revolution of the wheel.
Check for the Right Tension
After you’ve worked your way around the wheel all spokes will have some built-up tension in them and in order to relieve some stress you should “squeeze” the spokes together by hand. After squeezing them, check the tension on all spokes by “listening to them”. You can do this by tapping them with, for instance, a screwdriver. A tight spoke will make a nice “PING” sound, loose spokes will sound flat. The higher the ping sounds, the tighter the spoke. Tighten all spokes equally until all spokes will have a nice ping. After this process, it’s a good idea to check the runout again to be sure that the rim and hub are still in place.
And finally it’s time to check if the spokes actually have enough tension. Check your workshop manual for the exact tension to be sure that all spokes have enough tension. For this final step you need a spoke torque wrench, but make sure that you don’t actually turn the nipples, because that will result in a potential new runout!
And that’s it, you’ve actually trued your motorcycle wheel and it’s ready to get some rubber! Don’t forget to place a rubber strip in the rim that covers the nipples.
Video: How to True a Motorcycle Wheel
These are the plain and simple basics of truing a motorcycle wheel! Hope this helps and for your reference I’ve place a pretty clear video below containing all steps and instructions. Good luck!
[su_youtube url=”https://www.youtube.com/watch?v=FCQtuGfz3c8″ width=”740″]