Stuck in the middle? Check out my Café Racer Building Plan!
Building a café racer means that you strip your bike down to only the necessary functions. The stock wiring harness is one of the things you want to strip down to a minimum. If you take a look at your workshop manual, you can see that the original wiring looks extensive and complex. You don’t need to get scared because building a café racer means that you can ditch a lot of functions! If you want to go down to the bare essentials for your your café racer wiring you need:
- Headlight (with Hi/Lo switch)
- Taillight
- Brake switch
- Ignition and coil
- Rectifier
- Optional: battery
- Optional: starter solenoid
What do you need?
If you’re working on your café racer wiring, you need to get the right ingredients:
- Volt meter
- Stripping tool
- Colored wiring
- Automotive connectors (heat shrink & waterproof)
- Lighter/heater
- Electrical tape
There are a lot of different bikes, but when it comes down to electronics, you can all put them in 2 boxes: fueled by a carburetor or fuel injection. Note that these wiring diagrams are meant for the first type and that you can use them on a lot of bikes from the 60’s, 70’s and 80’s. Please also check my article about the best bikes for your café racer project.
Café Racer Wiring – Electrical Starter
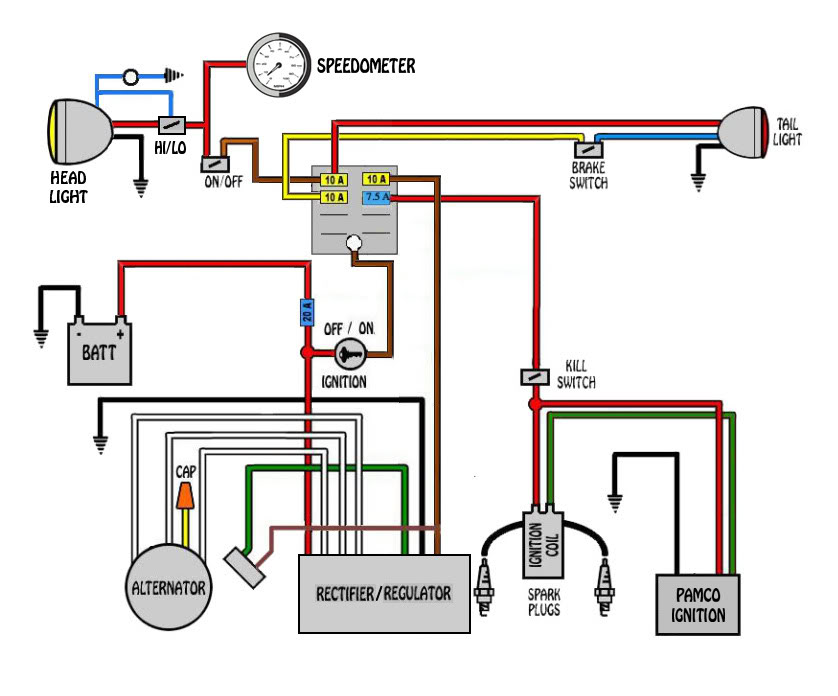
One of the most simple and complete cafe racer wiring diagrams with a battery and starter I’ve found:
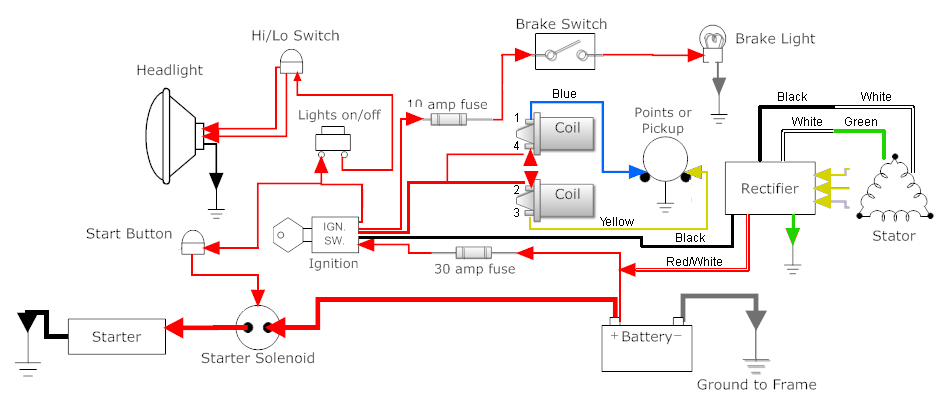
This is also a clear wiring diagram:
And if you prefer some more visuals, this is a nice wiring diagram:
Café Racer Wiring – Kick Only
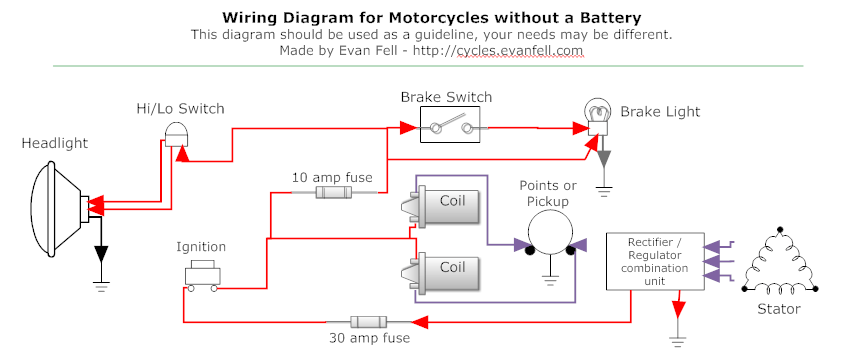
You can choose for an option without battery and starter (kickstarter only). This is the leanest & cleanest way:
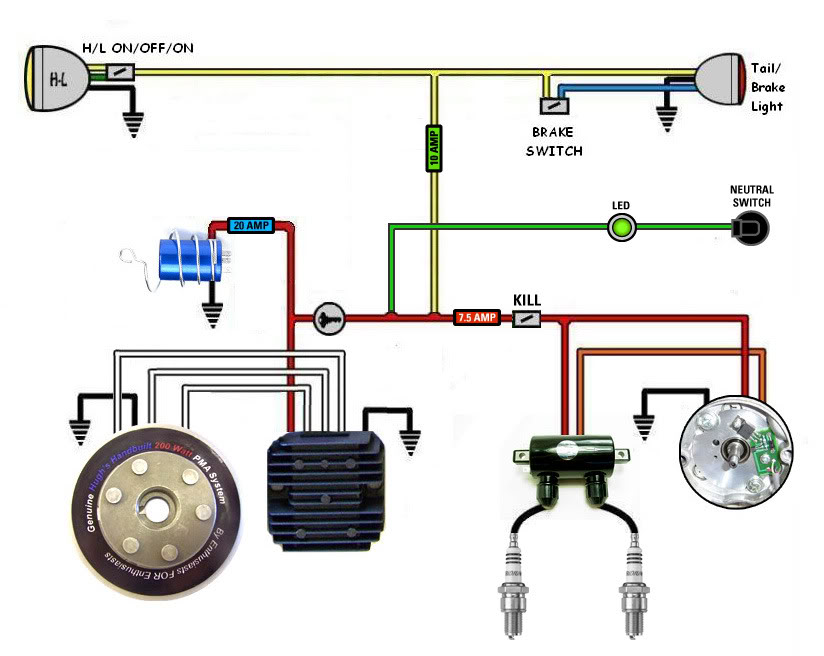
This one will also work:
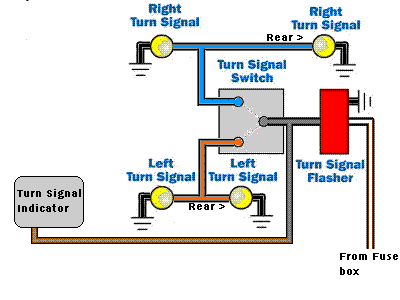
What about turning signals?
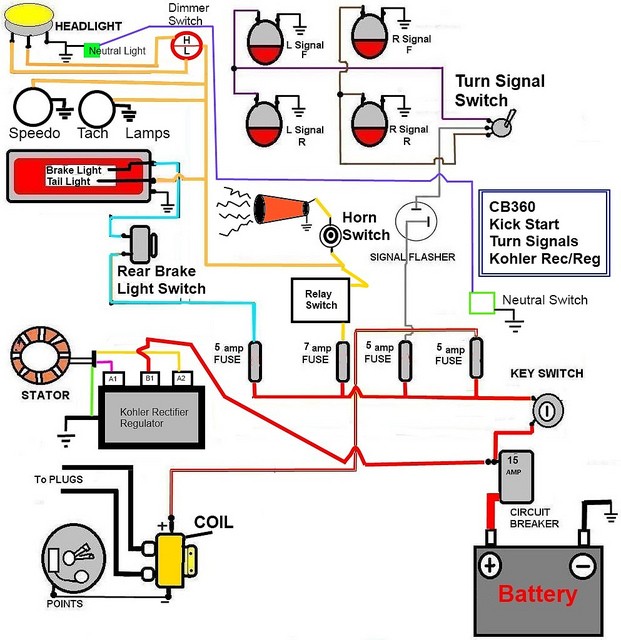
Some prefer to also use turning signals on their café racer. In that case, this café racer wiring diagram could help:
Or you can just use this wiring diagram to fit in one of the other diagrams:
Upgrading your electronic systems
It’s possible to reuse all parts you’ve stripped from your bike, but when you really want to upgrade your ride, this is the moment to upgrade your electronic systems too. To develop a state of the art café racer, you can:
- Replace your battery (I prefer the Antigravity models)
- Use an electronic ignition instead of points
- Replace the rectifier/regulator
- Replace your ignition coils
- Replace your stator
- For the real nerds: a Motogadget control unit.
If you’ve got any questions or suggestions: please let me know!
Thanks to:
Working on a 1983 gpz 750 and was wonder about wiring coil pickup straight to coil. It got 4 wires from pickup 1 blue 1 yellowish brown and 2 black with white stripes. So questions what to do with the 2 black and white
I want to go with the kickstart only option on a Honda CM200. I am going to upgrade to a 12V rectifier/regulator, change the coils and rewire. Is there anything I am missing for it to be functional?
Hi Sean,
You’re all set, but make sure you use one of these diagrams (or a model specific diagram if you can find one).
Good luck!
Thanks a lot mate. Turning my Guzzi T5 into a Cafe Racer and after a lot of thought, have decided to ditch the old electrical system and start a new one from scratch. Will be basing the system on your sketches! So once again thanks and wish me luck!
Hi Jake,
Thanks! Looking forward to your finished project.
Good luck!
Joeri
hi. im from the philippines, and im a newbie. unfortunately my single cylinder mc had its wires all shorted. its a 2008 model sym rv1(taiwan made).. im thinking of having its electricals straight from the engine but im not sure about its diagram.. most mc company here in the ph arent giving manuals on motorbikes so im really in a mess right now. atleast give me some tips on how i can do it like in a cafe racer bike.. really appreciate if you do. thanks. by the way its only 110cc bike..
Wish Me Luck !!!
Will those diagrams work for my 78 cb750. Having trouble getting my battery to take the charge back. Got brand new anti gravity batt. With new rect/reg. Seithed the points out for electronic ignition with Dyna coils. E3 spark plugs with Spiro pro 8 mm wires. All new wire through out. Got a key switch with push button electric start? Please help
Im just beginning the process of moving the electrics on my gs450sx to a tray and want to strip as much away as possible. There is sensor that will not allow you to start the bike unless the clutch is pulled. Can i remove that without running into any problems? Basically my question is can i just follow the wires of the things I do not want and remove them compketely? I appreciate any input .
I am installing the m-unit basic on my VF1100c. No one shows in any install example of hooking up an electric fuel pump. What is with that?
Hello,
Thank you for the informative write up.
I have a 1985 BMW k100RS, An M-unit blue, a Motoscope pro, breakout box b and a BEP 3.0, along with aftermarket hand control buttons.
Do you have a wiring diagram that will use the stock speed sensor? I cannot seem to find anything.
Thank you so much!
Hi Gene!
Thanks for the comment and your question.
We do not have such a diagram, but it might be wise to check out the BMW Custom and classic bikes page on facebook and post qour question there.
Lots of knowledge there (https://www.facebook.com/groups/962477957236994/)
Cheers!
The simplicity of my wiring problem is exceeded only by my incompetence in anything electrical. The motorcycle is a ’77 Yamaha TT500 thumper flat track racer with no lights, no battery, no switches. I’ve dropped my trousers and bought an electronic ignition on Ebay but the seller has been more helpless than me when it comes to wiring it up. Two wires come from the trigger, the coil stands lonely with a spade connector on one end, the stator has two wires coming from it – one hot and the other appears to be a ground. That’s all – so simple. Can you help with guidance on what should be wired to what? I have trouble with a flashlight. Thanks!
I’m wiring up a 83 nighthawk 650 from scratch! A wire grounded out and melted my wiring harness and fuse box! I ordered them and noticed I have so many unused factory wires and hope this diagram can help me simplify things