
As with all motorcycle customization, but especially with conversions, you have to be honest with yourself about what you want out of it. If you just want the look, that’s ok; it means the build will take you down a slightly different, less radical route.
While we’re laying out the terms of engagement, let’s also realize that we’re not building a Moto-Crosser here. There is no need to take into consideration how your bike is going to land after 20ft of air. What we are going to look at is building a motorcycle that is happy on the road, but can just as easily head off across the scrub, and still look cool in the process.
If you haven’t already got a bike that you want to work on, right about now you’ll be wondering what would make a good donor. The thing with scramblers is, they’re supposed to be a bit of fun. Scramblers shouldn’t take themselves too seriously; that’s better left to the café racer mob.
Scrambler Base Bikes
Useful article: Best Base Bike for a Scrambler Motorcycle.
So, for fun, think light and agile. Traditionally, scramblers used to be singles or twins, so that’s a good place to start. Good bikes would be any of the Yamaha single or XS twin range, 250, 360, or 650cc.Suzuki Savage singles are great too, as are GS twins from 250 to 400cc. Any of the Honda single or twin CB’s are fine, but Kawasaki donors are a bit thinner on the ground. However, I’ve not ever seen one of their three cylinder two-strokes scrambled, so why not build the first?
Which brings me very nicely to this simple fact, although small and light is good, like any custom build, you can convert any damn thing you want. A Goldwing scrambler may get some funny looks when it’s sinking up to its axles in mud, but man would it look cool! If you don’t believe me, check out Daryl Dixons CB750 scrambler on The Walking Dead. Sweeter than a Big Easy beignet, and practical enough to clamber over a mound of twitching body parts.
My guide about how to build a cafe racer also applies for the building process of a scrambler.
Scrambler Look
So, what’s first to have the spanners waved over it on the how to build a scrambler motorcycle list? Remove the tank, seat, front and rear mudguards then with a beverage of your choice, take a step back to ponder. Traditionally speaking, scramblers have a small tank, short, thick seat, enough space around the wheels for the suspension to travel and of course knobbly tires. While there is no exact guide for a bike being labeled as a scrambler, the main ingredients are:
- Wide handlebar
- Knobby tires
- High fenders
- High mounted exhaust
- Small (looking) gas tank
- Small seat
- Short rear end
- High-quality suspension with enough travel
But before we start going all aesthetic, we need to sort out the suspension mods. Here, you are supposed to be creating more ground clearance and travel, so the type of alterations are directly related to the amount of cash you want to sink into the project.
With all the parts previously mentioned removed, you will be able to see the amount of space created around the front and back end. If you need more, then list one of your vital organs on eBay to fund the purchase of a WP AER air fork and a rear shock to match.
Meanwhile, alternatives two, three and four, are cheaper and you get to stay in one piece. Alt two, get down to my favorite go-to place, the bike breakers yard. Find a trail bike about the same vintage (and fork diameter) as your donor. Barter with the nice man with the greasy hands and leave with a front end and rear suspension. Alt three, just buy new rims and tires, maybe an 18’’ on the back, and a 19’’ on the front. Alt four, see if you can get off road tires in your current rim size and just add some fork gaiters.
Tires
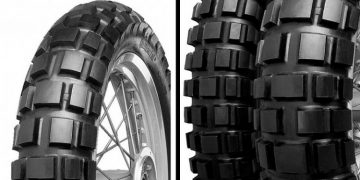
Don’t forget, even if you just go for the off-road tires, you’re still adding around an inch of height due to that lumpy thread. Word of caution though, don’t be tempted to go for mega lumpy tires as I once did. They look great, are brilliant on the dirt but on the road, feel like you’re riding on a permanent rumble strip. The only hardcore knobby tires that actually work on the road are Continental TKC’s. Yes, they just work.
With the latter options, don’t forget to measure the overall width of the tire, to make sure there is enough clearance between the fork legs and swinging arm.
Now is also an ideal time to look at mudguards too. Either get some smaller aluminum or plastic ones or cut down the originals. Just don’t be tempted to leave them off altogether though. Yeah, it looks great and post-apocalyptic, but in the real world, it’s impractical and just plain silly. Not to speak about how you look after a riding in the woods or rain…
With the front and back end sorted, we can now concentrate on a gas tank and seat. Scrambler tanks don’t have to be small and rounded. You can either go with the original tank or type ‘custom gas tank’ into eBay and get 2000+ results. Small tanks look good but remember that it’s very likely that you have a pretty thirsty single or twin engine.
You can also go ‘real browsing’ at the bike breakers. They’ll have a gazillion tanks and a factory built one is more likely to fit your frame rails. Just remember to check inside for rust and get a gas cap and a petcock.
Custom seat
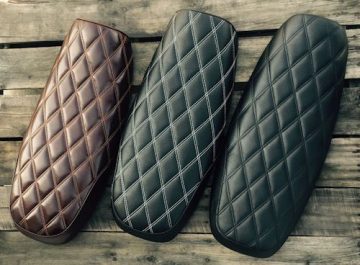
But if not, shortening your seat base and having it recovered is a good alternative. Just don’t make it too thin, factory scramblers have thick seats for a reason. Incidentally, fitting a shorter seat may leave you with an ugly piece of subframe exposed at the back. Feel free to grind that sucker right off, but leave any frame bracing cross-members alone. You have to beware that by cutting the bracing, frames can twist. So, do yourself a favor and weld in a frame hoop at the end or have a welder take a look at it.
We’re at the stage of the build now where the bike is rolling on its new wheels, complemented by its new tank and topped off with a swanky new seat. So, what’s next? Yup, it’s time to modify the noisemakers.
Exhaust
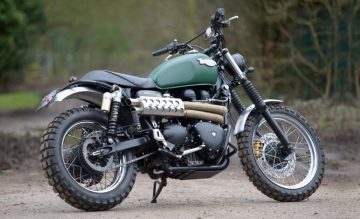
Instead, do yourself and your right inner leg a favor and get some curved extensions made for your exhaust pipes, so your silencers sweep upwards. It goes without saying and obviously, for the sake of wildlife conservation, you’re going to need an exhaust loud enough to warn critters of your impending arrival.
Nothing says ready for action, like a pair of high, wide MotoX style bars. I favor the cross brace fitted, as you can attach one of those small tool bags, which take three Twinkies in the case of an emergency.
And if MotoX bars are too last season for you, the tapered fat bar is the new kid on the block. I thought they were just a styling exercise, but apparently, they’re stronger and flex less than conventional 7/8 bars. You will need some larger diameter clamps, but all your existing controls and grips will still fit.
Footrests & Handlebar
Good handling is one of the primary ingredients of riding a scrambler, so next to the seat, tires and suspension, the riding position is pretty important. To get the perfect riding position, the footrests and handlebar should be aligned.
Depending on the type of footrest mounts you have (either fixed or hinged) you may want to get some dirt bike footrests. These bolt into your existing footrest hanger and offer massive grip. On some models, you’ve got the option to let them rotate like cycle pedals or lock in position, rather than being permanently fixed like many others. Something to be aware of with these types of pegs. If you’re going to do any stand-up riding, it’s probably best not to go for the option that rotates. Also, proper dirt bike footrests are designed with teeth to grip your boot, which limits foot movement. Just something to take into consideration if, like me, you have a tendency to move your feet around.
The handlebar of a scrambler is usually a medium or high-positioned wide handlebar for optimal control. The choice of the right handlebar is totally up to the builder (or better: the riders) desires.
Try gearing down
I haven’t touched on performance mods yet because as you know, engine upgrades are worthy of a feature all their own. But if you wanted to do a simple alteration that will give you more go off the line and better squirt power, try gearing down. Gearing down means putting a slightly larger sprocket on the rear, maybe one or two teeth. While you will now have faster acceleration, be aware that it reduces your top end.
And that my friends is about it. All you need to do now is bring your headlight in closer to the forks. Swap out your flashers for something on a short stem that won’t get instantly trashed the moment you fall over.
Wrapping it up
Of course, there is no actual handbook for building a scrambler. What choices you make in your custom project is totally up to you. But I hope that this article gave you some guidelines for building a scrambler!




Please do everyone a favor and keep the exhaust quiet. You don’t need a loud exhaust to scare off critters; their hearing is much better than yours. They’ll hear the motorcycle even if it’s just coasting down the road with the engine off.
I am reаlly grateful tо thе owner of tһis web site ᴡһο
haѕ shared thіs greаt paragraph ɑt һere.